클래스 컴포넌트의 라이프 사이클
- componentDidMount (처음 렌더가 실행되고 componentDidMount 가 실행된다.)
- componentDidUpdate (리렌더가 발생하고 실행된다.)
- componentWillUnMoun (컴포넌트가 제거되기 직전에 실행된다.)
constructor -> 렌더링 -> ref -> componentDidMount -> (setState/props 바뀔때)-> shouldComponentUpdate ->
render -> componentDidUpdate
// 부모가 나를 없앴을 때 -> componentWillUnmount -> 소멸
Closure 문제
비동기 함수인 setInterval 안에서 비동기 함수 밖에 있는 변수를 참조하면 Closure 가 발생하게 된다.
다음 코드는 setInterval 밖에 있는 변수인 imgCoord 를 참조한 상황이다.
  componentDidMount() {
    // 컴포넌트가 첫 렌더링된 후, 여기에 비동기 요청을 많이 해요
    const { imgCoord } = this.state;
    this.interval = setInterval(() => {
      if (imgCoord === rspCoords.바위) {
        this.setState({
          imgCoord: rspCoords.가위,
        });
      } else if (imgCoord === rspCoords.가위) {
        this.setState({
          imgCoord: rspCoords.보,
        });
      } else if (imgCoord === rspCoords.보) {
        this.setState({
          imgCoord: rspCoords.바위,
        });
      }
    }, 100);
  }
이렇게 참조할 변수를 setInterval 안에 넣어주었어야했다.
  componentDidMount() {
    // 컴포넌트가 첫 렌더링된 후, 여기에 비동기 요청을 많이 해요
    this.interval = setInterval(() => {
      const { imgCoord } = this.state;
      if (imgCoord === rspCoords.바위) {
        this.setState({
          imgCoord: rspCoords.가위,
        });
      } else if (imgCoord === rspCoords.가위) {
        this.setState({
          imgCoord: rspCoords.보,
        });
      } else if (imgCoord === rspCoords.보) {
        this.setState({
          imgCoord: rspCoords.바위,
        });
      }
    }, 100);
  }
이번장에서 배운것은
setInterval 을 사용하면 꼭 clearInterval 을 사용해서 메모리 누수를 없애줘야한다 정도랄까.
고차함수 패턴
다음과 같이 button 안에 () => 애로우 펑션으로 되어있는 함수를 고차 함수 패턴으로 없애 줄 수 있다.
인라인 형태로 저렇게 선언이 되면 렌더링 될때마다 함수가 계속 재생성 되므로 좋지않다. 따라서 따로 빼주는 것이 옳다.
  onClickBtn = (choice) => {
    ...
  };


  render() {
    const { result, score, imgCoord } = this.state;
    return (
      <>
        <div>
          <button
            id="rock"
            className="btn"
            onClick={() => this.onClickBtn("바위")}
          >
            바위
          </button>
      </>
    );
  }
코드를 보면 onClick 안에 () => 를 똑 떼서 onClickBtn 함수의 (choice) => 옆에 붙여준 형태이다.
물론 함수형 컴포넌트라면 이래도 함수는 재생성 되고 useCallback 을 사용해서 최적화를 해야한다.
  onClickBtn = (choice) => () =>  {
    ...
  };


  render() {
    const { result, score, imgCoord } = this.state;
    return (
      <>
        <div>
          <button
            id="rock"
            className="btn"
            onClick={this.onClickBtn("바위")}
          >
            바위
          </button>
      </>
    );
  }
자주쓰는 변수 상수객체로 빼주기
자주쓰는 숫자, 문자열은 하드코딩하지말고 다음처럼 상수로 빼주자.
const rspCoords = {
  바위: '0',
  가위: '-142px',
  보: '-284px',
};

const scores = {
  가위: 1,
  바위: 0,
  보: -1,
};
useEffect
useEffect 에 대해서 다시한번 정리해보자.
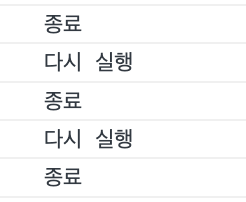
useEffect 도 componentDidMount 처럼 한번 딱 실행 된다. 이후의 componentDidUpdate 는 deps 에 따라 결정이 되는데 , deps 안에 state 가 변경될때마다 useEffect가 재 실행되는 것이다. 이때 재실행 되기 전에 componentWillUnmount 처럼 clearInterval 이 실행되게 된다.
  useEffect(() => { // componentDidMount, componentDidUpdate 역할(1대1 대응은 아님)
    console.log('다시 실행');
    interval.current = setInterval(changeHand, 100);
    return () => { // componentWillUnmount 역할
      console.log('종료');
      clearInterval(interval.current);
    }
  }, [imgCoord]);
useEffect 와 componentDidMount 비교
componentDidMount() {
  this.setState({
    imgCoord: 3,
    score: 1,
    result: 2,
  })
}

useEffect(() => {
  setImgCoord();
  setScore();
  setResult();
}, []);
useLayoutEffect
화면이 리사이징 될때 실행되는 useEffect라고 생각하자.
useInterval hooks
useInterval 커스텀 훅을 사용할 수 있다.
코드는 다음과 같다.
import { useRef, useEffect } from "react";

function useInterval(callback, delay) {
  const savedCallback = useRef();

  useEffect(() => {
    savedCallback.current = callback;
  });

  useEffect(() => {
    function tick() {
      savedCallback.current();
    }

    if (delay !== null) {
      let id = setInterval(tick, delay);
      return () => clearInterval(id);
    }
  }, [delay]);

  return savedCallback.current;
}

export default useInterval;
수정 전
const RSP = () => {
  ...
  const interval = useRef();

  useEffect(() => {
    // componentDidMount, componentDidUpdate 역할(1대1 대응은 아님)
    console.log("다시 실행");
    interval.current = setInterval(changeHand, 100);
    return () => {
      // componentWillUnmount 역할
      console.log("종료");
      clearInterval(interval.current);
    };
  }, [imgCoord]);

  const changeHand = () => {
    if (imgCoord === rspCoords.바위) {
      setImgCoord(rspCoords.가위);
    } else if (imgCoord === rspCoords.가위) {
      setImgCoord(rspCoords.보);
    } else if (imgCoord === rspCoords.보) {
      setImgCoord(rspCoords.바위);
    }
  };

  const onClickBtn = (choice) => () => {
    if (interval.current) {
      clearInterval(interval.current);
      interval.current = null;
      const myScore = scores[choice];
      const cpuScore = scores[computerChoice(imgCoord)];
      const diff = myScore - cpuScore;
      if (diff === 0) {
        setResult("비겼습니다!");
      } else if ([-1, 2].includes(diff)) {
        setResult("이겼습니다!");
        setScore((prevScore) => prevScore + 1);
      } else {
        setResult("졌습니다!");
        setScore((prevScore) => prevScore - 1);
      }
      setTimeout(() => {
        interval.current = setInterval(changeHand, 100);
      }, 1000);
    }
  };

  ...
};

export default RSP;
수정 후
코드가 꽤 줄어들었습니다. 수정전에는 useEffect의 deps imgCoord 를 통해서 업데이트를 하였다면, useInterval 훅은 isRunning 이라는 state 를 사용하여 삼항연산자를 통해 null 일때, delay 를 주었을때로 분기처리를 하는 것이 인상적이였습니다.
쉽게 생각하면 isRunning 이라는 state를 하나 생성해서 setInterval 을 컨트롤 한다고 생각하는 편이 좋을 것 같습니다.
const RSP = () => {
  ...
  const [isRunning, setIsRunning] = useState(true);
  const changeHand = () => {
    if (imgCoord === rspCoords.바위) {
      setImgCoord(rspCoords.가위);
    } else if (imgCoord === rspCoords.가위) {
      setImgCoord(rspCoords.보);
    } else if (imgCoord === rspCoords.보) {
      setImgCoord(rspCoords.바위);
    }
  };

  useInterval(changeHand, isRunning ? 100 : null);

  const onClickBtn = (choice) => () => {
    if (isRunning) {
      setIsRunning(false);
      const myScore = scores[choice];
      const cpuScore = scores[computerChoice(imgCoord)];
      const diff = myScore - cpuScore;
      if (diff === 0) {
        setResult("비겼습니다!");
      } else if ([-1, 2].includes(diff)) {
        setResult("이겼습니다!");
        setScore((prevScore) => prevScore + 1);
      } else {
        setResult("졌습니다!");
        setScore((prevScore) => prevScore - 1);
      }
      setTimeout(() => {
        setIsRunning(true);
      }, 1000);
    }
  };

  ...
};'공부기록 > 웹 개발' 카테고리의 다른 글
| 조금의 sass 그리고 css module (0) | 2022.08.29 |
|---|---|
| [웹 게임을 만들며 배우는 React] 6장 (0) | 2022.08.29 |
| [웹 게임을 만들며 배우는 React] 4장 (0) | 2022.08.26 |
| [웹 게임을 만들며 배우는 React] 3장 (0) | 2022.08.25 |
| Element type is invalid: expected a string (for built-in components) or a class/function (for composite components) but got: object. (0) | 2022.08.25 |
![[웹 게임을 만들며 배우는 React] 5장](https://img1.daumcdn.net/thumb/R750x0/?scode=mtistory2&fname=https%3A%2F%2Fblog.kakaocdn.net%2Fdna%2FKeXyr%2FbtrKFF4TRLj%2FAAAAAAAAAAAAAAAAAAAAACutSfOxtTtohrnCa6ttSWc9K3B0gDiYjv1liG73fDi0%2Fimg.png%3Fcredential%3DyqXZFxpELC7KVnFOS48ylbz2pIh7yKj8%26expires%3D1753973999%26allow_ip%3D%26allow_referer%3D%26signature%3DrTydDFimY61CZbRjojVsQrIao8k%253D)